
Learning how to Improve Your Vocal Processing can drastically improve the quality of your music.
All technical decisions are driven by creativity in Dance Music Production and the number of techniques you can implement with vocal processing is truly head spinning.
Read on to discover 15 of our top tips for vocal processing, in order to help you get the most out of your vocal parts.
Contents
- Use Reverb In Moderation
- Sidechain Reverb To The Source Vocal Signal
- Remove Unwanted Transients With A Limiter or Volume Automation
- Apply A High Shelf EQ Boost
- Use A De-Esser To Remove Sibilance
- Use A Short Delay
- Remove Resonances With EQ
- Apply Saturation
- Send To A Chorus Bus
- Automate Channel Gain Manually To Better Sculpt Dynamics
- Get To Know The Attack Setting On A Compressor
- Create Space For Your Vocal In The Mix
- Get Creative With How You Combine FX
- Create Climactic And Interesting End Phrases Using FX
- Bookmark/Save This Article

1. Use Reverb In Moderation
Improves: ✅ Frontal Position in the Mix. ✅ Presence. ✅ Clarity.
Removes: ❌ A Drowned Out Mix. ❌ Excess ‘Floatiness’.
When it comes to vocal processing, one of the most common mistakes we see is overdoing it with the reverb.
With it being such a fantastic and powerful effect, it’s not surprising how producers fall into this bad habit.
Just remember that too much reverb pushes the vocal back in the mix, bringing it away from its crucial position at the front.
To avoid this, try increasing the number of early reflections on your reverb as opposed to the decay time.
You could also consider substituting the reverb for a short ‘slapback’ delay, which will give a similar and sometimes better effect.
Reverb is perhaps the most powerful and effective tools to use on a vocal, so time spent learning more about How To Use Reverb On Vocals In A Mix will certainly be time well spent.

Perhaps its one to bare in mind for your future dream studio?
2. Sidechain Reverb To The Source Vocal Signal
Improves: ✅ Presence. ✅ Intelligibility. ✅ Clarity. ✅ Headroom.
Removes: ❌ Wet Signal From Source Vocal. ❌ Poor Reverb-Vocal Interactions.
If you decide to use reverb on your vocal, try this neat trick to help improve the way they interact and sit with one another in the mix.
- On the vocal channel, Set Up A Reverb On A New Send and apply the desired settings – be careful not to overdo the decay time.
- Add A Compressor After The Reverb in the FX chain on the send.
- Configure The Compressor to be a sidechain compressor, using the vocal channel as the input.
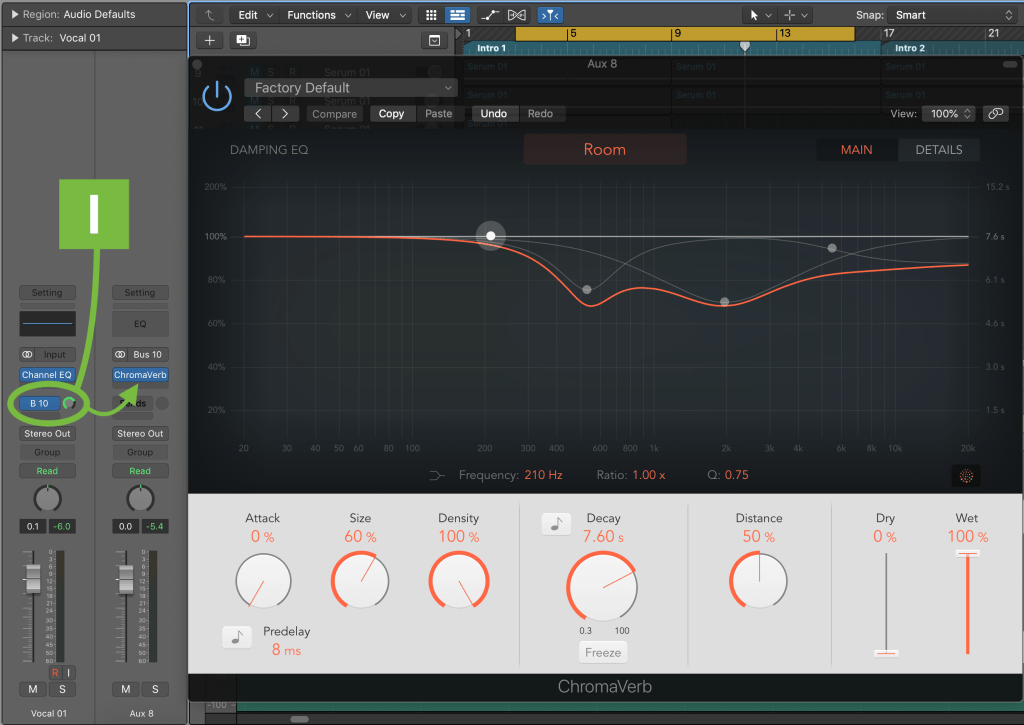

The vocal will now cause the reverb volume to duck whenever the vocal is playing, much like how music is ducked on a radio station whenever the radio host is speaking.
This is done by a Sidechain Compressor with very aggressive settings so that it is practically acting as a limiter. See audio example below.

3. Remove Unwanted Transients With A Limiter or Volume Automation
Improves: ✅ Clarity. ✅ Intelligibility. ✅ Headroom.
Removes: ❌ Harsh Artefacts (Pops & Clicks). ❌ Dynamic Range (Be Careful).
When working with raw and unprocessed vocals its common to find pops, clicks and other hidden artefacts that cause sharp, steep transients to appear in the waveform.
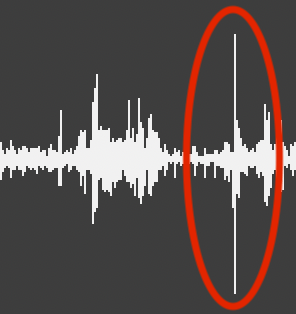
Transients such as these can be tamed with the use of a limiter.
Clearing out these unwanted transients gives your mix more headroom.
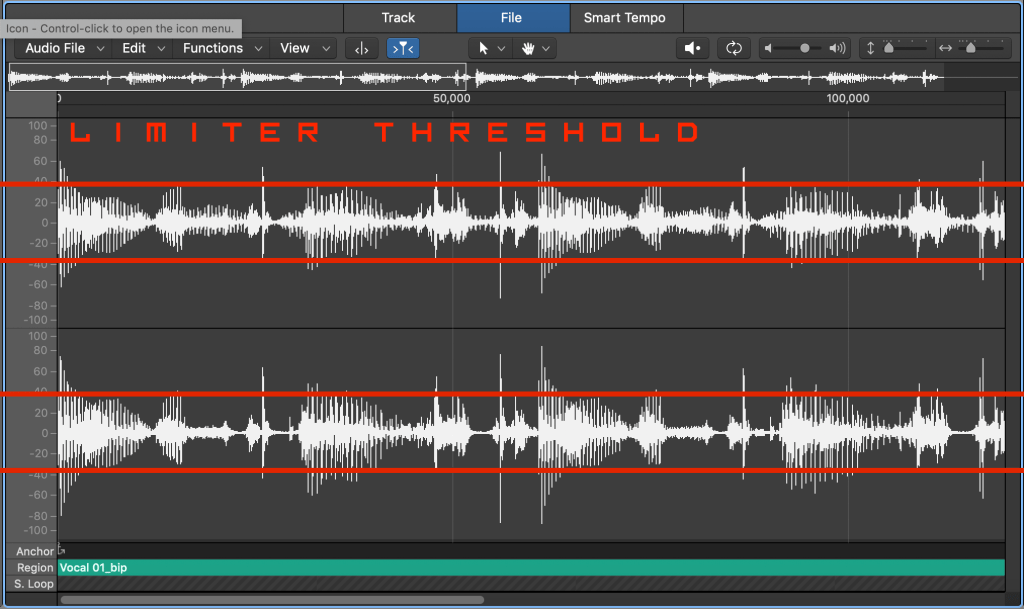
Start by placing a limiter on the vocal channel and slowly bring down the threshold until the limiter begins to activate when the transients are played.
Tip: For a visual demonstration, apply just the limiter to the channel and bounce the vocal in place so you can compare the two waveforms.
When done correctly you should be able to see the transients have been reduced significantly.

A nice way of understanding limiting is to visualise the waveform literally getting cut.
The line in which the waveform will be ‘cut’ is the limiter threshold, all of the audio above the threshold gets cut down to the threshold line, eliminating/reducing transients – see image below.
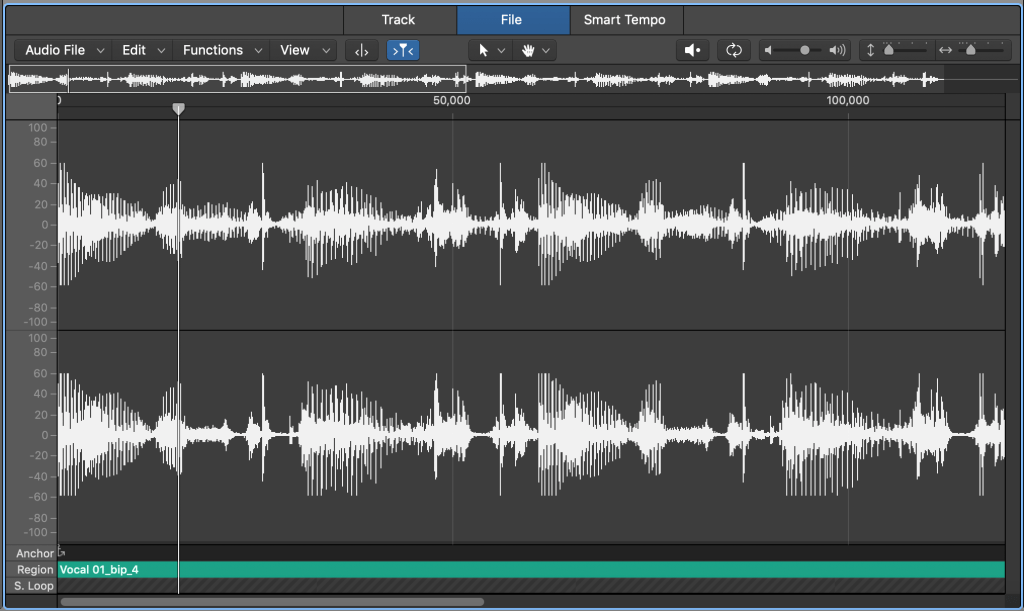
As you can see from the examples above, limiting isn’t always the best way to remove clicks and pops, as the limiter will be affecting the rest of the signal uniformly.
If the clicks are embedded within the recording and sitting below the peak transients of the vocal parts, limiting wont even affect the click before it crushes the vocal.
In this case, limiting is really not ideal.
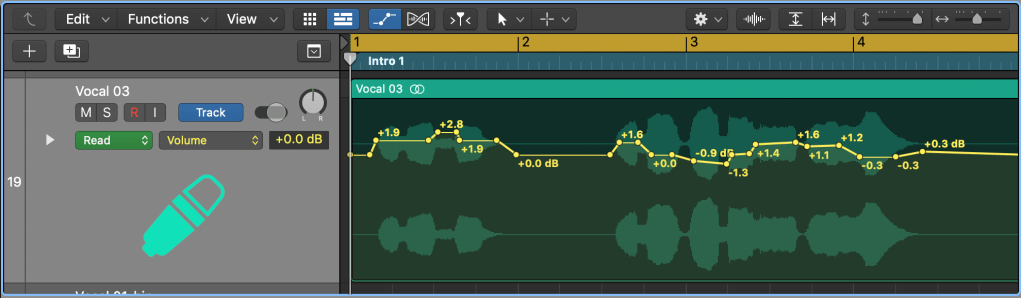
A solution to this is to write in volume automation to manually remove the artefacts as in the picture below.

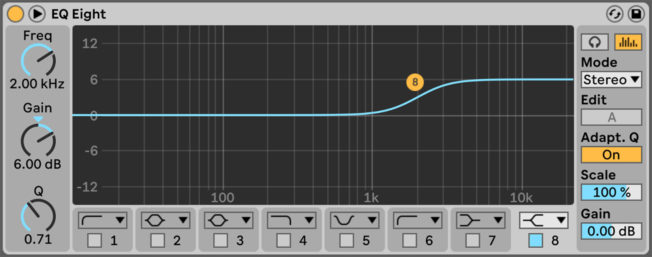
4. Apply A High Shelf EQ Boost
Improves: ✅ Frequency Balance From A Poor Recording. ✅ Presence. ✅ Clarity.
Removes: ❌ ‘Boominess’ From A Recording.
Close proximity to a microphone accentuates lower frequencies and can make a vocalist sound boomier.
Vocals often benefit from a high shelf EQ boost, which can improve its clarity and presence.
Be aware when applying a high shelf EQ boost, you may also be pronouncing any Sibilance in the recording.
It is advisable to apply a low shelf EQ cut to vocals in order to remove unwanted sub frequencies. This can improve headroom in the mix and remove muddiness in the low end.
However, remember that each vocalist is different and might carry important tones in the lower frequency bands. Cutting at 100Hz to remove all frequencies below is a good place to start – it is rare to ever require frequencies below 100Hz in your vocal.

5. Use A De-Esser To Remove Sibilance
Improves: ✅ Intelligibility. ✅ Clarity.
Removes: ❌ Sibilance (harsh vocal formants).
Harsh resonances, sharp tonal hisses and formants can be introduced by certain syllables when recording vocalists.
These harsh artefacts are referred to by Producers as Sibilance.
Applying a DeEsser will help to reduce the presence of Sibilance in your vocals if re-recording the vocal is not an option.
Target frequencies between 5-8kHz as sibilance is often focused in this band.
See Our Guide To Understanding & Combatting Sibilance With Vocals if you want to learn more about this topic and how to use a DeEsser to remove sibilance.

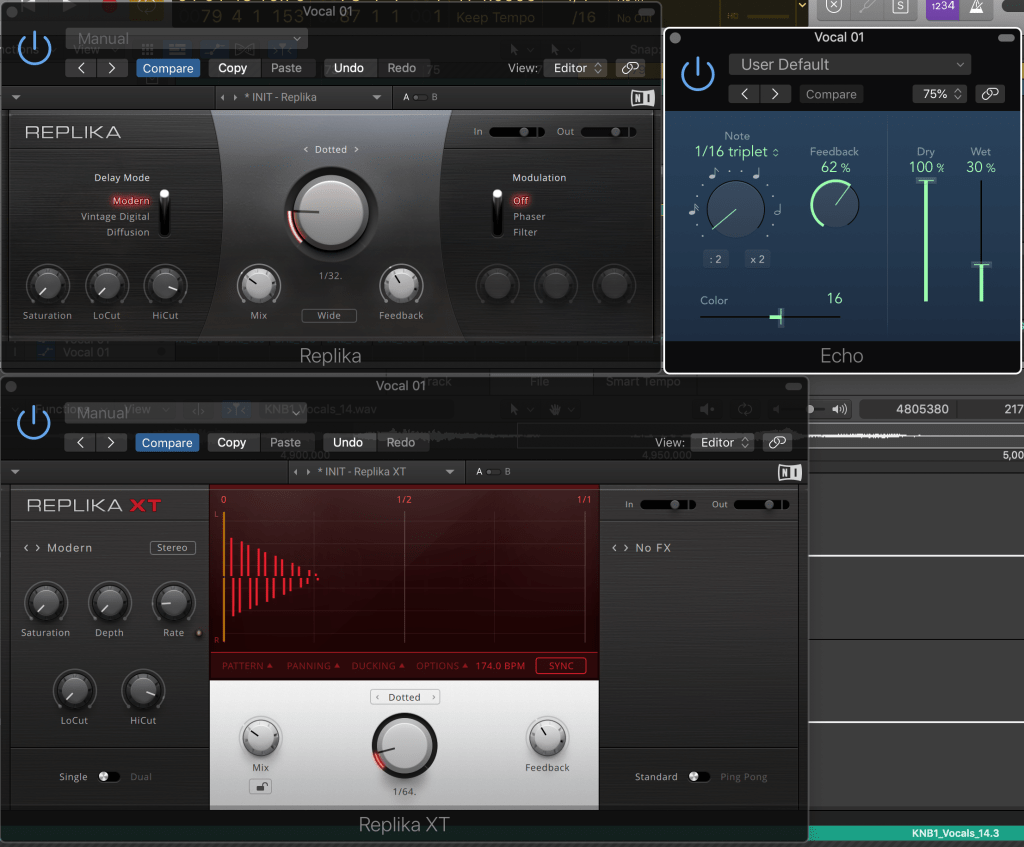
6. Use A Short Delay
Improves: ✅ Intimacy. ✅ Presence.
Removes: ❌ Over-Reliance on Reverb.
Adding a Delay with a very short decay is a technique used to help make a vocal more intimate and can even substitute and do a better job than reverb in some cases.
Here are some settings we recommend as a starting point on your plugin:
- Take the decay time right down to very small (1/32 or an even bigger fraction of a note).
- Around 40-60% feedback – this may need to be higher depending on how small you make the Decay time.
- 20-30% of the signal as wet.
7. Remove Resonances With EQ
Improves: ✅ Intelligibility. ✅ Clarity.
Removes: ❌ Resonant Tones. ❌ Harsh Artefacts.
Resonant tones can significantly reduce the quality and clarity of your vocal.
With a trained ear, you may be able to identify resonant tones in your vocal without any audio or visual aid.
Otherwise try these two methods for identifying resonant tones:
Comb through your vocal with a high Q factor EQ boost and listen out for overpowering volume on harmonics as you sweep.
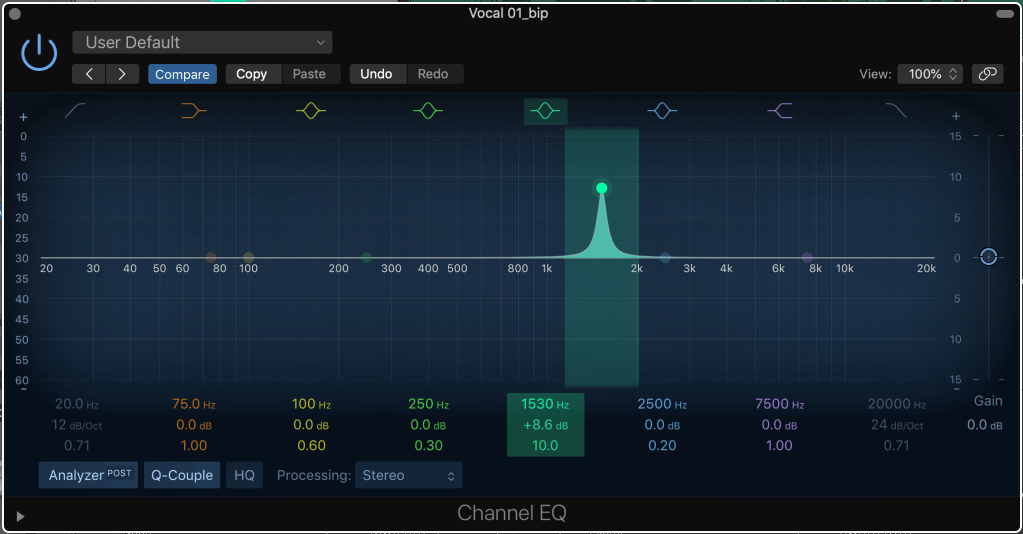
You can use a visual frequency analyser to spot any overbearing harmonics.
Once you have identified some resonance, experiment with an EQ notch and reduce the tone to different levels to test what sounds better.
When doing this, it’s highly advisable to not use a high Q factor when reducing a resonant tone.
The reason for this is explained well by James Wiltshire in his F9 Audio article titled 6 Common EQ mistakes in DAW production:
“Only the very finest digital EQ’S are capable of such Hi-Q notches and even then there are phase artefacts that are doing more damage than good to your audio.”
James Wiltshire – F9 Audio
Digital EQ’s cannot perform high Q values nearly as well as their visuals suggest, so keep those Q values at 4 or less.
Remember that resonance is a natural part of all vocals and an important part of what makes it sound natural, but sometimes acoustics, recording or performance technique or microphone choice can accentuate resonances and create problems.
Its this problem you are fixing, so be careful not to overdo it and completely remove an important harmonic from your vocal.
8. Apply Saturation
Improves: ✅ Headroom. ✅ Presence. ✅ Power.
Removes: ❌ Dull or Weak Vocal Presence.
Saturation will help to bulk out a vocal by introducing new harmonics across different frequency bands.
We recommend setting up a send to your Saturation or overdrive plugin of choice, fed by 10-60% of the original signal.
Saturation is a subtle form of distortion, designed to replicate the pleasant-sounding harmonics introduced by analogue equipment.

The effect can be used creatively to create a sonically pleasing character in vocal processing.
Check out J37 by Waves if you are looking for a good saturation plugin.
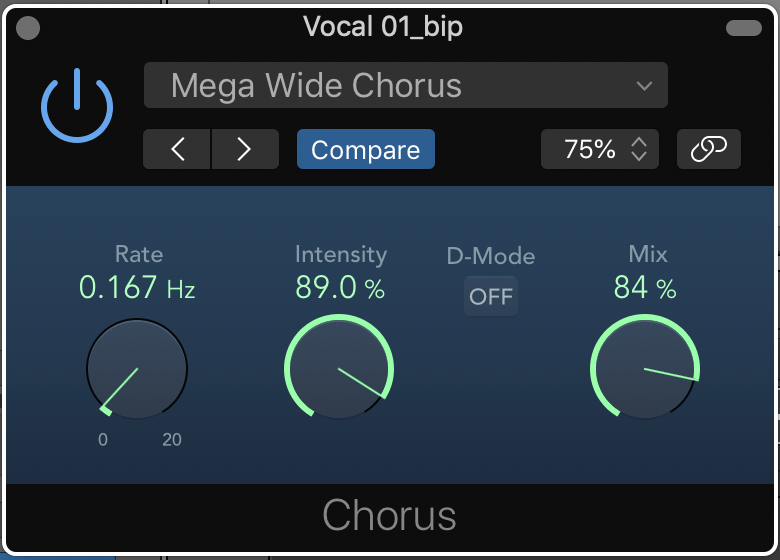
9. Send To A Chorus Bus
Improves: ✅ Stereo Image (Width). ✅ Position In The Mix. ✅ Presence. ✅ Clarity.
Removes: ❌ Monophonic Presence and Fidelity (Be Careful).
Chorus is a popular and powerful tool in vocal processing, a send to a wide chorus can transform and significantly improve a vocals presence.
It is also brilliant at separating harmonies, ad-libs and chorus parts from the lead vocal when used with even gentle settings.
Be wary of too much chorus on the lead vocal as it can cause problems with the mono fidelity of the track – i.e. how well the mix of your song translates to being played in mono.
10. Automate Channel Gain Manually To Better Sculpt Dynamics
Improves: ✅ Dynamic Range Control. ✅ Presence. ✅ Clarity.
Removes: ❌ Specific, Targeted Dynamics from The Vocal.
The compressor is an excellent tool available to the producer for controlling and sculpting dynamics, but there is no way more precise than to draw in the volume automation yourself.
The advantage to this is that it gives you total control to sculpt and manipulate the dynamics of your vocal, as opposed to the whole signal being affected unilaterally by a compressor’s settings.
Though time consuming, consider experimenting with this method for better dynamic control and your vocal could benefit.
11. Get To Know The Attack Setting On A Compressor
Improves: ✅ Control Of Position In The Mix. ✅ Presence.
Removes: ❌ Transients At Fast Settings (Be Careful).
Though many producers focus on the Threshold and Ratio settings of a compressor, the attack setting is also as important and capable of significantly affecting your vocals transients and position in the mix.
In the video featured below, Fab Dupont of pureMix concludes: “You have to train yourself to hear the difference between over-compression because of too much compression, or over-compression because of too much attack.”
He also gives some valuable insight into Compressor Attack, with audio examples – be sure to use some good headphones or monitors in order to hear the detail in his examples.
Be mindful that when using very fast attack settings (<10ms) the transient will get killed and create less presence and texture in the vocal.
Consider experimenting with attack settings yourself and train your ear to make the distinction Fab explores in the video.
12. Create Space For Your Vocal In The Mix
Improves: ✅ Centre-Stage Mix Presence. ✅ Clarity. ✅ Intelligibility.
Removes: ❌ A Cluttered Mix. ❌ Incomprehensible / Drowned Out Vocals.
Vocals typically occupy a very broad frequency band and as a result tend to compete for space with other elements of the track.
Try modifying the output all of these elements that clash with the vocals to a bus, then apply EQ to subtly reduce the relevant frequency band.
If the problem lies in one element in particular (such as a synth or snare), consider changing or removing this element to give your vocal the centre stage it needs.
You could also pitch drum parts to a different tone so they don’t clash with the vocals.
13. Get Creative With How You Combine FX
Improves: ✅ Track Quality. ✅ Your Own Signature Style.
Delay will likely always hold a top spot alongside Reverb and Chorus as one of the go-to FX plugins for Vocal Processing.
It just sounds great on vocals straight out of the box.
For this reason it’s easy to apply simple settings, be happy and move on.
Next time, try experimenting with combining your delay with a glitch or stutter FX plugin such as Fracture by Glitch Machines (Free Plugin).
It may take some experimentation, but as a result you can create a far more interesting and ear catching moment that will separate your tune from the crowd. Check out the audio example given below.
14. Create Climactic And Interesting End Phrases Using FX
Improves: ✅ Track Quality. ✅ Transitions. ✅ Your Own Signature Style.
In most cases you will want your listener to understand your vocal and the message of the lyrics.
So it’s often a good idea to shy away from extremely heavy processing, but that doesn’t mean there is no space for it.
Consider automating FX fills in the final phrase or word of your vocal verse as in the example below.
Delay is commonly used to pronounce the end of a vocal verse, but the sky is the limit as to what you could use.
Test some of these ideas out to inject some sauce into the end phrases of your vocals:
- Sudden Heavy Distortion and Flanging.
- 100% Wet Reverb + Delay on a send.
- Glitch Stutter FX + A Reverb Rise.
- Ping Pong Delay + Chorus.
FX fills are also a brilliant technique on rhythmic parts, especially drums and a common feature in our DNB Sample Packs.
15. Bookmark/Save This Article
Through what is likely to be the result of tireless experimentation and hard work, some artists manage to develop their audio processing techniques into unique avenues that we conceive as their own signature sound across their work.
Music production is akin to a more technical form of painting or a similar creative artform, where your imagination is truly your limit.
It is also true that, the more time you put into the craft, the more a true and consistent sound of ‘you’ will emerge.
For the most part, you won’t want to overload the listener with creative FX on your vocal if you want the lyrics to be heard and understood clearly.
Unless you are looking to use vocal processing as a unique and signature sonic imprint in your work – a feat well demonstrated by artists such as Apex Twin and Burial.

If you find yourself having to really heavily process a vocal before it sounds good you are likely working with a bad vocal – so consider revisiting the recording or sourcing an alternate vocalist for your track.
The key with vocal processing (and as an extention, the craft of Music Production as a whole) is to understand the tools well and the principles behind them so that you can create without hindrance.
We hope this article has helped you with this!
If you enjoy what you read, consider bookmarking it for future reference.
This Article is brought to you by KAN Samples.
Pro Audio Tools for Producers.
Subscribe For Free Samples
You Will Get:
✅ 100% Royalty Free Samples For Music Production.
✅ A Free Demo Pack of our latest Product.
✅ Free Demo Packs of all Future Products.
✅ Unsubscribe any time.
✅ No junk mail.

0 comments on “15 Ways To Improve Your Vocal Processing”