
Compressors come in many different forms (VCA, FET, Optical, Tube and more) and feature a myriad of different modelling systems to achieve different results.
The world of compression gets very complex surprisingly quickly, considering it’s all about simply adjusting volume.
In this article we are going to explore the topic of Parallel Compression, a popular Music Production Compression Technique.
Contents
- What Is Parallel Compression?
- The Benefits Of Parallel Compression
- How To Set Up Parallel Compression
- When You Should Use Parallel Compression
- Tips on Using Parallel Compression

What Is Parallel Compression?
Parallel Compression is a Music Production technique used in Mixing and Recording.
The principle of the technique is to blend an uncompressed signal with a heavily compressed version of the same signal.
To Parallel Compress a signal, the input signal must be fed into two paths, one is a direct ‘through’ path, while the other feeds into a downward compressor.
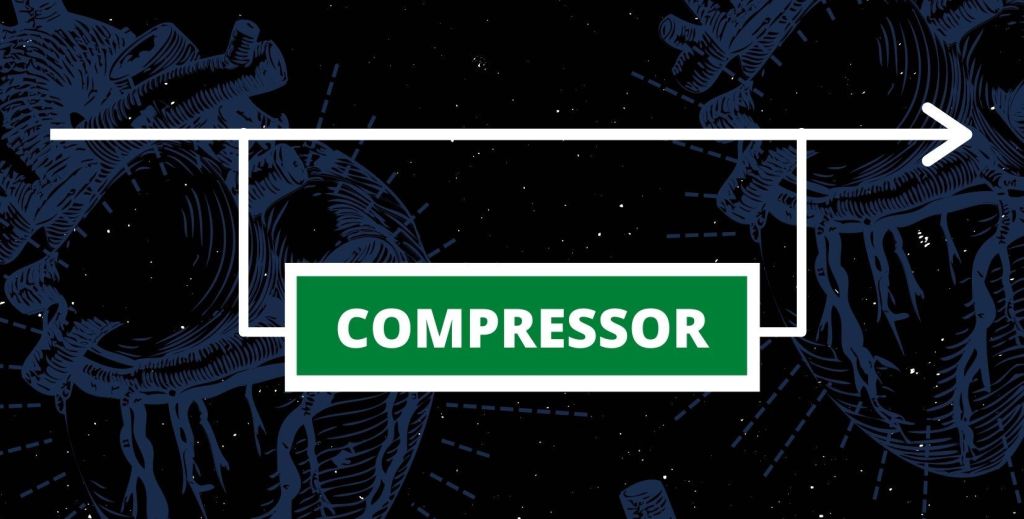
Arrow displays the signal direction.
The output of the compressor is mixed at unity gain with the direct path to produce the ‘Parallel Compressed’ signal.
Downwards Compression And Upwards Compression Explained
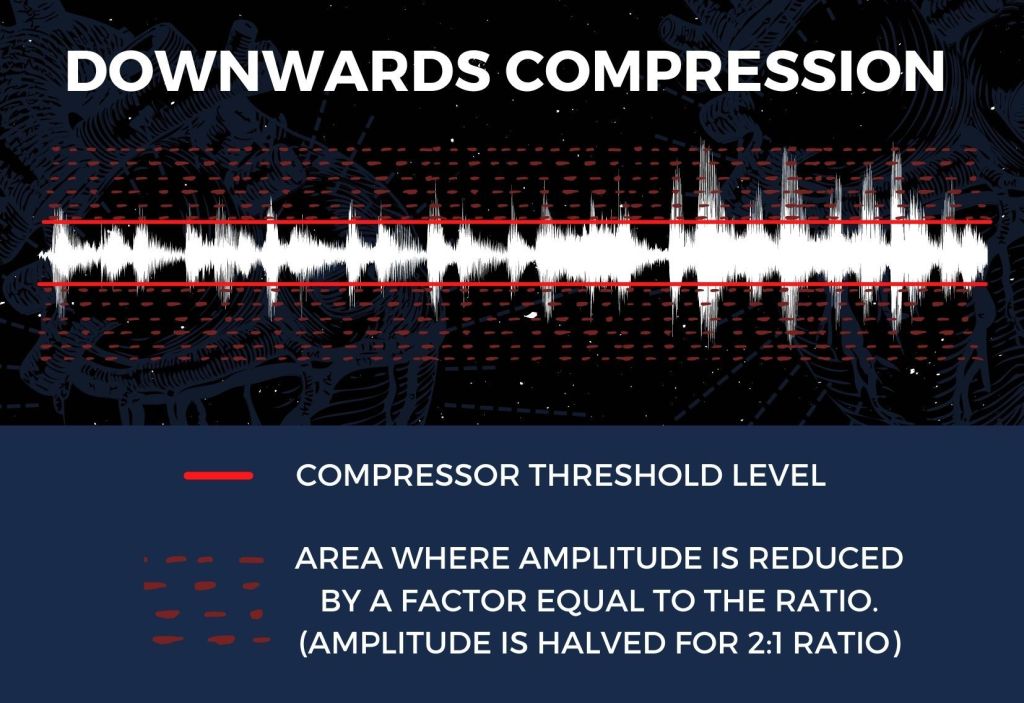
The vast majority of Compressor models operate using Downward Compression.
This means the signal amplitude is pulled down.
So loud parts of the signal are made quieter by the compressor.
Parallel Compression attempts to achieve the opposite effect (bringing the lower levels of the signal up) by using a Downward Compressor.
Downward Compression: Signals below the threshold level are left alone, while the signal above the threshold is squashed by an amount according to the ratio of the compressor.
Upwards Compression: Signals below the threshold level are increased by an amount according to the ratio of the compressor.
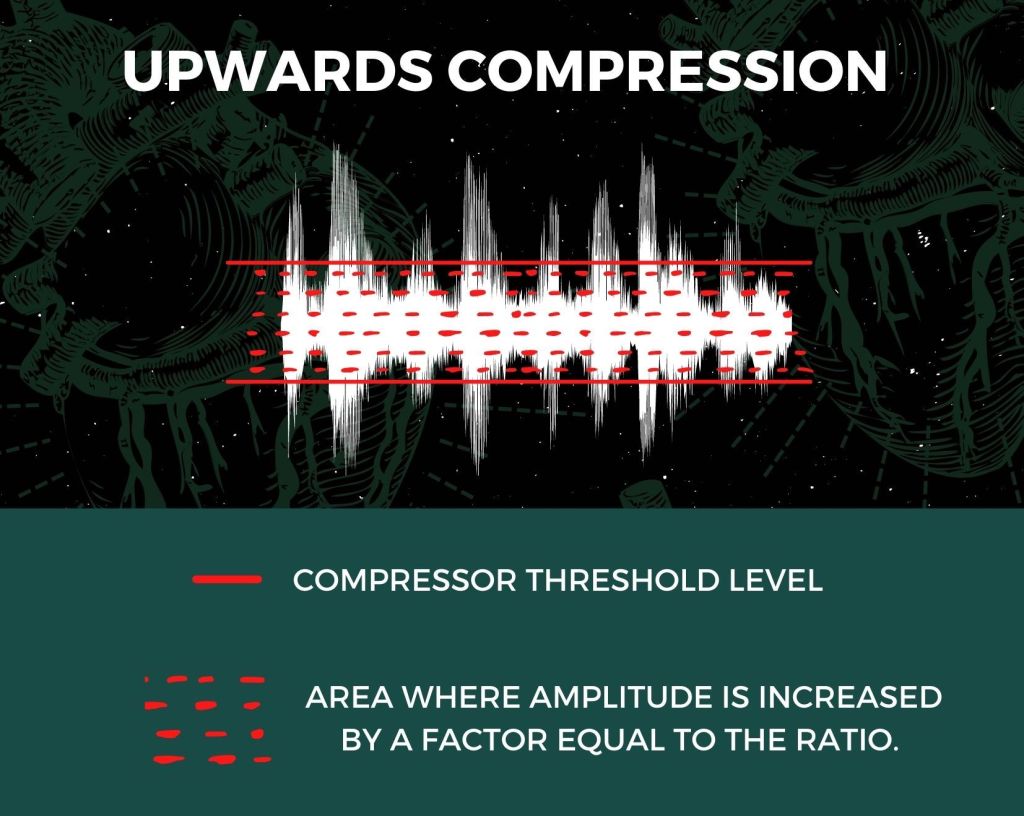
Both Downwards Compression and Upwards Compression reduce the dynamic range of an audio signal.
How Parallel Compression Approximates Upwards Compression
The technique of Parallel Compression was invented in the 60’s.
Its aim was to mimic the results of Upwards Compression by using the Downward Compressors found in conventional studios.
Downward Compressors affect the transients of the audio signal first. It is bringing these higher levels of amplitude down.
Upwards compression works in the opposite way. It aims to bring the quieter parts of the signal up in amplitude.
Importantly, transients are left intact with upward compression. It is only the quieter parts of the signal that are being affected (their amplitude is increased).
As parallel compression is achieved using Downward Compression, the transients are not left entirely unaffected.
So it is a bit more complex than perfect upwards compression.
Instead there is some change in their amplitude depending on how high a ratio is used on the parallel compressor and what percentage of the compressed signal is fed back into the source signal.
For this reason professionals refer to Parallel Compression as a means of ‘approximating’ upwards compression.
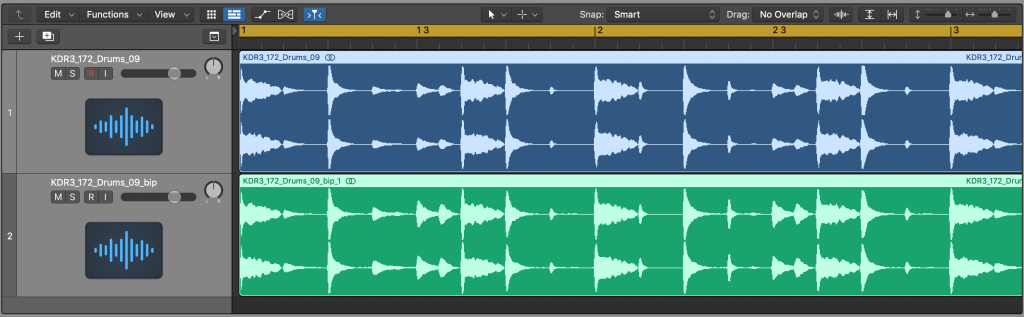
Notice how the quieter parts of the signal have gained amplitude whilst the transients are almost unaffected.

The circles highlight one point in the signal where amplitude has increased.
The Benefits Of Parallel Compression
By blending a heavily compressed version of an audio signal with itself, the signal becomes fortified with an identical signal that has lower dynamic range.
A form of ‘Upwards Compression’ is achieved, where the quieter parts of the audio signal are turned up.
Reducing dynamic range in this way adds strength and presence to the Target Instrument/Vocal/Group in the mix without significantly affecting the transients of the signal (this is perceived audibly as maintaining a more natural sound).
The effect is great on vocals, drums, lead synths or any element of a track that needs to stand out or have more power in the mix.

How To Set Up Parallel Compression
Many Software Plugin Compressors feature a Wet/Dry knob.
Using this control configures Parallel Compression in the same way that routing the compressor through a Pre Fader Return Send would.
Compressor Settings For Parallel Compression
When applying Parallel Compression, heavy compression settings are recommended, try the following settings as a starting point:
- Set the attack as fast as possible (<10ms). This is done in order to tell the compressor to react immediately after the sound hits.
It’s important that all of the transient information is being heavily compressed on your parallel compression channel.
So you will usually always need to use very fast attack settings.
A slower attack time can also be used creatively to make the drum transients more loud and contrasting – as the compressor will not be engaging on them. - Turn the threshold down almost all the way (or alternatively turn the input of the compressor up).
The trick is to find the spot where the edge of the signals’ sustain is where the compressor starts to release. - The ratio is used to control the desired texture that is added by the parallel compression.
Higher ratio settings will create a more distorted sound. A 2:1 ratio will create a more natural and clean sound.
Remember that when operating with an extremely low threshold even a light ratio of 2:1 will create a very powerful effect.
If you are after a strong up front sound, 2:1 is a good place to start. You can even venture below this ratio and still get good results. - You can use either fast or slow release times, depending on the desired effect.
So experiment with this.
Faster release times can accentuate room sounds as the quieter parts of the signal will increase in amplitude.
Slower release times can place more emphasis on the transients and increase punch. - Then adjust the level of the Wet/Dry knob (or aux track if using a send) until the instrument/vocal sounds balanced and natural in the mix.
Make sure you have the full mix playing when you do this.
When using a send, it’s likely that you will need to turn down the original dry track to compensate for the increased volume the parallel compression adds.

How To Set Up Parallel Compression Using A Wet/Dry Control
After setting up the compressor using the settings detailed above, move the Wet/Dry knob (or mix knob) to 100% Wet, before dialling it back to taste.
When you blend the compressed signal back in using the Wet/Dry knob, you’ll get a more natural sounding compression curve than using regular Downwards Compression and this technique should result in a more “forward” sound.
When a compressor is operating with a ratio at or above 20:1 it is behaving like a limiter, as the output level will barely rise regardless of how much the input level exceeds the threshold. If using an extreme threshold level, very high ratios will introduce distortion – sometimes this is a desired effect.
How To Set Up Parallel Compression Using A Send
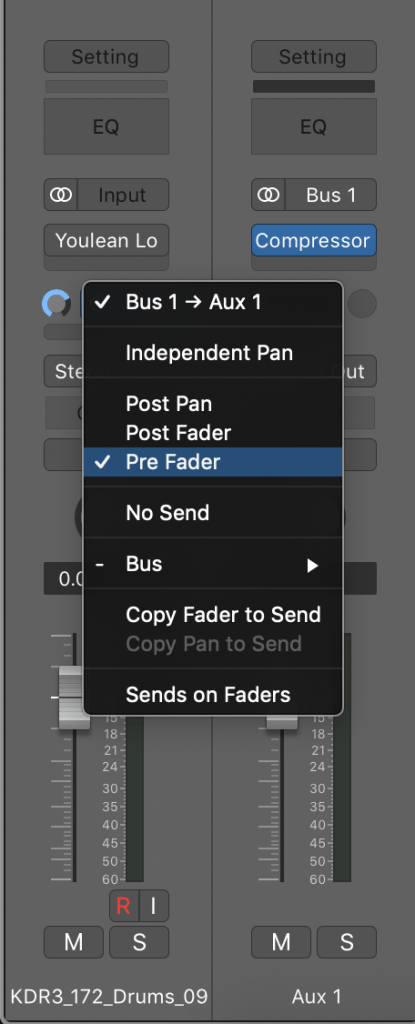
If your compressor does not have a Mix knob, set up the compressor on a Pre Fader Send.
Its important that you set it up on a Pre-Fader Send and not a Post Pan or Post Fader Send.
Most DAWs by default always create ‘Post Pan’ sends, so make sure that you change this by clicking on the send and selecting ‘Pre Fader’.

Use the channel fader for the send to adjust the balance of the compressed (wet) signal with the dry signal.
It is best to set the output of both of these channels to a bus and apply any volume automation to this bus to not disturb the balance.
Use compression settings as explained previously.
Why You Should Use A Pre Fader Send For Parallel Compression
There are three options available when making a send: Post Pan, Post Fader and Pre Fader.
Post Pan and Post Fader are pretty much the same thing – they route a signal to send after the Pan or Fader.
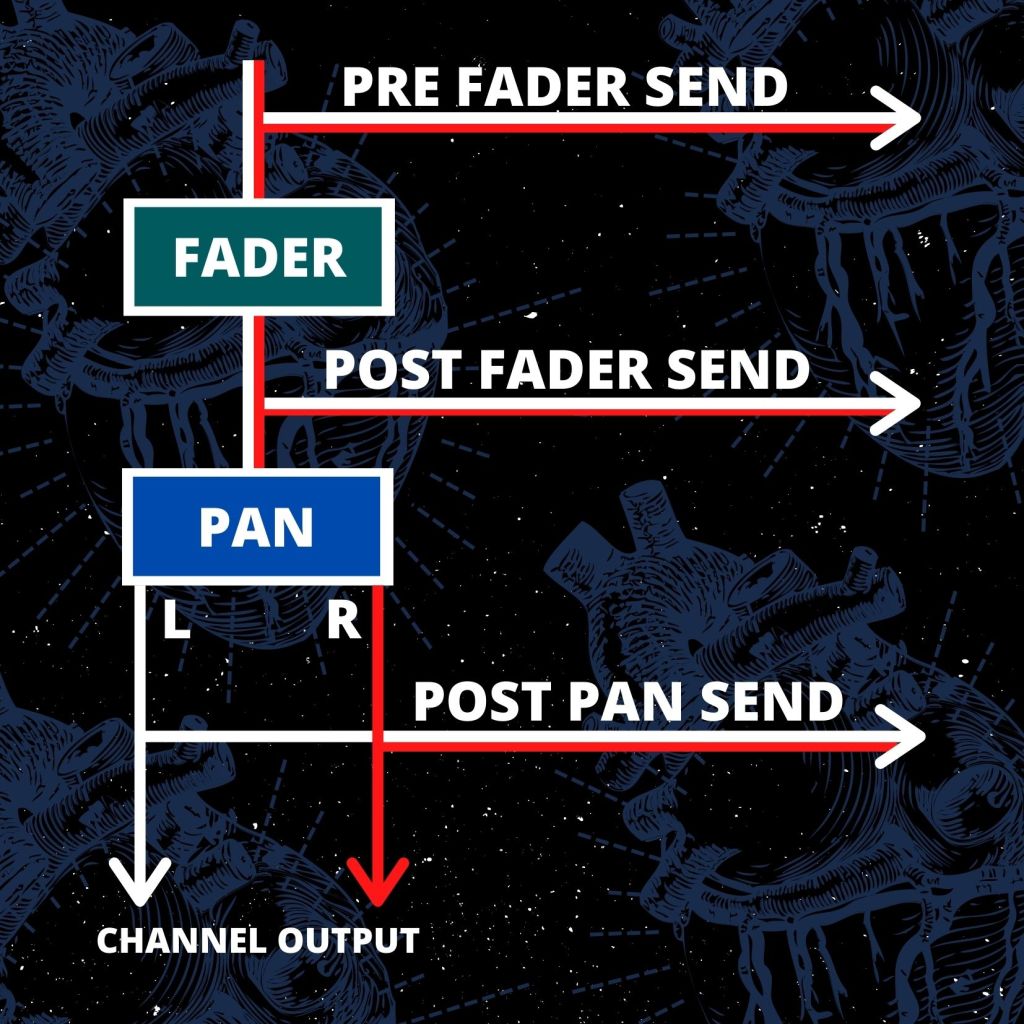
A post pan send will feed both fader volume and panning into the send.
Meaning that whatever you set the Volume or Pan to is going to affect how loud or quiet the signal being sent to the send is (along with the panning information, which is controlling the relative volume of the left or right channels).
So using a Pre Fader send means that no matter what you set the dry channel volume or panning to; the send will be unaffected.
If you do not use a Pre Fader send, the track volume will be affecting the input volume of the send featuring the Parallel Compressor.
So any volume automation on the channel will affect the volume of the input for the compressor and in turn have a big impact on what the compressor is doing.
Compressors are entirely dependant on how much gain is being sent into them.
However your problems don’t end there unfortunately.
Now that you are using a Pre Fader send you now need to remember the following:
Any automation placed on the dry track will not be affecting the level of the Parallel Compression channel.
It will in effect just be altering the balance of the two channels: doubling the dry tracks volume with automation will have no effect on the input of the send or its output level.
In this example the dry channel will become twice as loud relative to the wet (Parallel Compression) channel.
To combat this, set the output of both the dry channel and the wet channel to a bus.
This bus will contain the dry signal of your drum/vocal/lead (or whatever it is that you are parallel compressing) and the wet Parallel Compression signal from the send.
Don’t alter the volume automation of the dry channel when you are using Parallel Compression, instead automate the volume of this new bus/group.
This is so that the balance of the Parallel Compression output and the dry channel output will remain the same.
When You Should Use Parallel Compression
Parallel Compression is highly effective when used on audio with good amount of dynamic range and transient information.
For this reason it is most commonly used on a Drum Bus.
The technique is frequently adopted when producing most Electronic Dance Music genres in particular, where the Drums often need to be powerful and dominant the mix.
However its application frequently extends beyond Drums and can benefit any element of the track the Producer wishes to ‘pop out’ more in the mix.
Lead vocals for example are often treated with parallel compression.
The key thing to remember with Parallel Compression is that it subtly enhances a track without significantly changing the way the track sounds – as is often the case with adding a compressor directly onto the track.

Parallel Compression On Drums
The most popular application of Parallel Compression is on Drums, as the results can be so rewarding.
Density, energy, strength and punch are all words used to describe the effect of the technique on drums.
There are two ways that Parallel Compression can alter the sound of drums:
- Increasing the punch on loud transient elements such as the Kick and Snare.
This makes the drums sound more powerful and heavy on its main hits.
Achieved by using a slower Attack time and a slower Release time. - Increasing the volume of the decay of the Drum Hits, i.e. the ringing of the snare and chiming of the hats found in their tail.
The upwards compression increases the volume of all of the quieter parts of the signal, the tail of the Drum hits are part of this category.
Achieved by using a faster Attack time and a faster Release time.
To do both of these things at once on the drums by experimenting with using a faster attack time with a slower release time for example, which will.
Parallel Compression On Vocals
Some vocal recordings feature a large dynamic range – there is a big difference in amplitude between the loudest and quietest parts of the vocal.
With these tracks it is often best to utilise Serial Compression (using multiple compressors on the track together in series).
However, sometimes the vocal sits well, it is intelligible by the listener and does not feature big changes in the loudness throughout the recording.
Parallel Compression will not fix the large changes in dynamic range a vocal has in the same way Serial Compression can.
However, it can increase the quieter parts of the vocal and bring out the subtle details and nuances hidden within it.
It also allows the vocal tails at the end of phrases to not be lost in the mix.
To set up Parallel Compression for this purpose on a vocal track, start with a faster Attack time and a faster Release time on your compressor.
Parallel Compression can give great results and really help improve how a vocal sounds – read more about how to Improve Your Vocal Processing.
Tips on Using Parallel Compression
Parallel compression is just one example of a range of applications and techniques of compression as a tool in music production.
Here are a few tips that will really help you get the most out of this powerful technique:
- You can use parallel compression like a phase-free EQ:
Set up the parallel compressor as a sidechain compressor, using an EQ’d version of the source sound as its sidechain input signal.
If you EQ out the frequencies within the signal you want to enhance, the compressor will only be acting on the opposite frequencies. - Most of the time you will want to be using a fast attack time on the Parallel Compressor. If you use a slower attack time, you will be defeating the object of parallel compression.
- Experiment with EQing after the parallel compressor to add extra shine or presence in a target frequency band.
- Be wary of volume changes, make sure to use the makeup gain to adjust the volume of the track with the Parallel Compression applied so that it is the same volume as the original track – its easy to fall into the trap of thinking it sounds better because its louder.
- Make sure delay compensation is turned on. It takes a computer a few milliseconds to process sound through a compressor.
Most DAW’s have delay compensation turned on by default, but its worth double checking just incase, as this can cause comb filtering when the Parallel Compression signal is combined with the original track when using a send.
– See how to check using Logic Pro
– See how to check using Pro Tools
– See how to check using FL Studio
– See how to check using Ableton
– See how to check using Cubase - Don’t overdo it. Too much parallel compression can make a track sound super flat and one-dimensional, even fatiguing to the listeners ear.
Parallel Compression is a great technique to add to your skillset.
It can significantly improve your mixing skills by bringing new life into elements of your track by helping to achieve the stark contrast some lead elements need in the mix.
Consider bookmarking this post to use it as a reference.
This Article is bought to you by KAN Samples.
Pro Audio Tools for Producers.
Subscribe For Free Samples
You Will Get:
✅ 100% Royalty Free Samples For Music Production.
✅ A Free Demo Pack of our latest Product.
✅ Free Demo Packs of all Future Products.
✅ Unsubscribe any time.
✅ No junk mail.

0 comments on “Parallel Compression: A Music Producer’s Guide”